

designer-skill: cleaner UI from your agent.

Get it

Connect your agent in two steps.

Grab a free key, then paste one prompt into the client you already use.

  1. Get a key

    Free account, one emailed code. The key is shown once and dropped straight into the config below.

  2. Get a free key

Paste it where your agent reads it

Pick your client. Every snippet points at https://niblet-api.pymodel.com/mcp and carries the key itself, so nothing needs editing.

Paste into your coding agent’s chat

You now have access to Niblet Designer UI and designer-skill. Set up both in one pass; if either is already installed, refresh it rather than adding a second copy.
Use them throughout UI work. References and materials are optional additions and never block the task.

1. Install or refresh both skills into the user skill directory (not this project):
npx skills add PyModel/niblet-skill-mcp --skill niblet -g -y
npx skills add PyModel/designer-skill --skill designer-skill -g -y

2. Connect both MCP servers using this client's native MCP configuration, in the user-level (not project-level) config:

Name: niblet
Transport: Streamable HTTP
URL: https://niblet-api.pymodel.com/mcp
Authorization: Bearer YOUR_NIBLET_KEY

Name: designer-skill
Transport: stdio
Command: npx
Args: -y @pymodel/designer-skill-mcp@latest
(designer-skill is keyless: do not add a key to it.)

Write the Niblet key into that local config literally. Do not reference an environment variable unless you have confirmed it is set in the process this client is running in; an unset variable sends an empty or literal "${VAR}" header, and the server answers 401. Never commit, print, log, or share the key.

3. Verify: list each server's tools and confirm niblet exposes find_ui_references, find_ui_materials, get_design_reference, get_ui_component and designer-skill exposes get_preflight_brief, dispatch_intent, review_and_gate. Do not run a sample search. If niblet answers 401, read the response body — it says whether the header was empty, a placeholder, or an unknown key — and fix the config rather than retrying.

When setup is complete, confirm both skills are installed and both servers expose their tools. On UI work from now on: call get_preflight_brief first, use dispatch_intent to load only the references it recommends, pull screen references and materials from the niblet server, then call review_and_gate on the changed files before saying the work is done. If there is an active UI task, continue it. Otherwise say: "Niblet and designer-skill are ready. Show me the screen you're building and name one UI decision you want references for."

Copies with YOUR_NIBLET_KEY where a key goes. Create a key and it fills in on its own.

T3 Code uses your Codex or Claude Code configuration; set it up there.

Documentation

DOCS

Niblet combines a portable UI skill with a remote MCP server for focused references and hosted materials. The MCP exposes find_ui_references, find_ui_materials, get_design_reference, and get_ui_component. The dashboard gives Codex, Claude Code, Cursor, and generic HTTP MCP clients one setup prompt.

01. Connect

Create an account, confirm the emailed code, and make a key. Your dashboard then writes the config for your client, pointing it at https://niblet-api.pymodel.com/mcp with Authorization: Bearer <your key>. A key is shown once, when you create it, and opens the whole service — the MCP endpoint and the REST catalogue alike. Put the key itself in the client’s user-level MCP config — not a project file, and not an environment variable the client may not see. Revoke it from your dashboard and the next request stops working.

claude mcp add --transport http --scope user niblet https://niblet-api.pymodel.com/mcp \
  --header "Authorization: Bearer niblet_at_…"
02. Inspect

Before changing UI, the agent inspects the target components, shared styles, behavior, and nearby views. It preserves good existing work and identifies the primary user task before making visual decisions. For substantial new Web UI without a foundation, it may suggest up to three Web Packs and waits for you to choose or decline. A chosen Pack becomes the project's DESIGN.md; an existing file is never replaced silently.

03. Reference

When outside evidence can settle one concrete decision, find_ui_references can search relevant apps, journeys, or full screens. One strong result is enough. References are evidence, not templates.

find_ui_references({ query: "paywall after onboarding", platform: "ios", limit: 3 })
find_ui_references({ query: "billing settings page", platform: "web", limit: 3 })

04. Materials

When a named role is missing, find_ui_materials returns a few fonts, icons, event-bound animations, React components, or Web Packs. These complement the bundled Niblet design stack without adding a second set of design rules. Included materials carry verified scope and a signed receipt; external dependencies remain clearly external.

05. Build

The agent makes the interface feel specific to the product and makes the primary task as clear and effortless as possible. The product's requirements, existing system, accessibility, platform behavior, and explicit user intent remain authoritative.

06. Review

Once UI is rendered, the agent inspects the current interface in its local environment and fixes observable breakage, regressions, privacy exposure, supported accessibility evidence, and task-blocking composition. It reviews the rendered product rather than guessing from source code.

Connect Claude Desktop or claude.ai

Claude can’t send a key, so it signs in to your Niblet account instead. No key or config file is involved.

  1. Step 1

    Add the connector

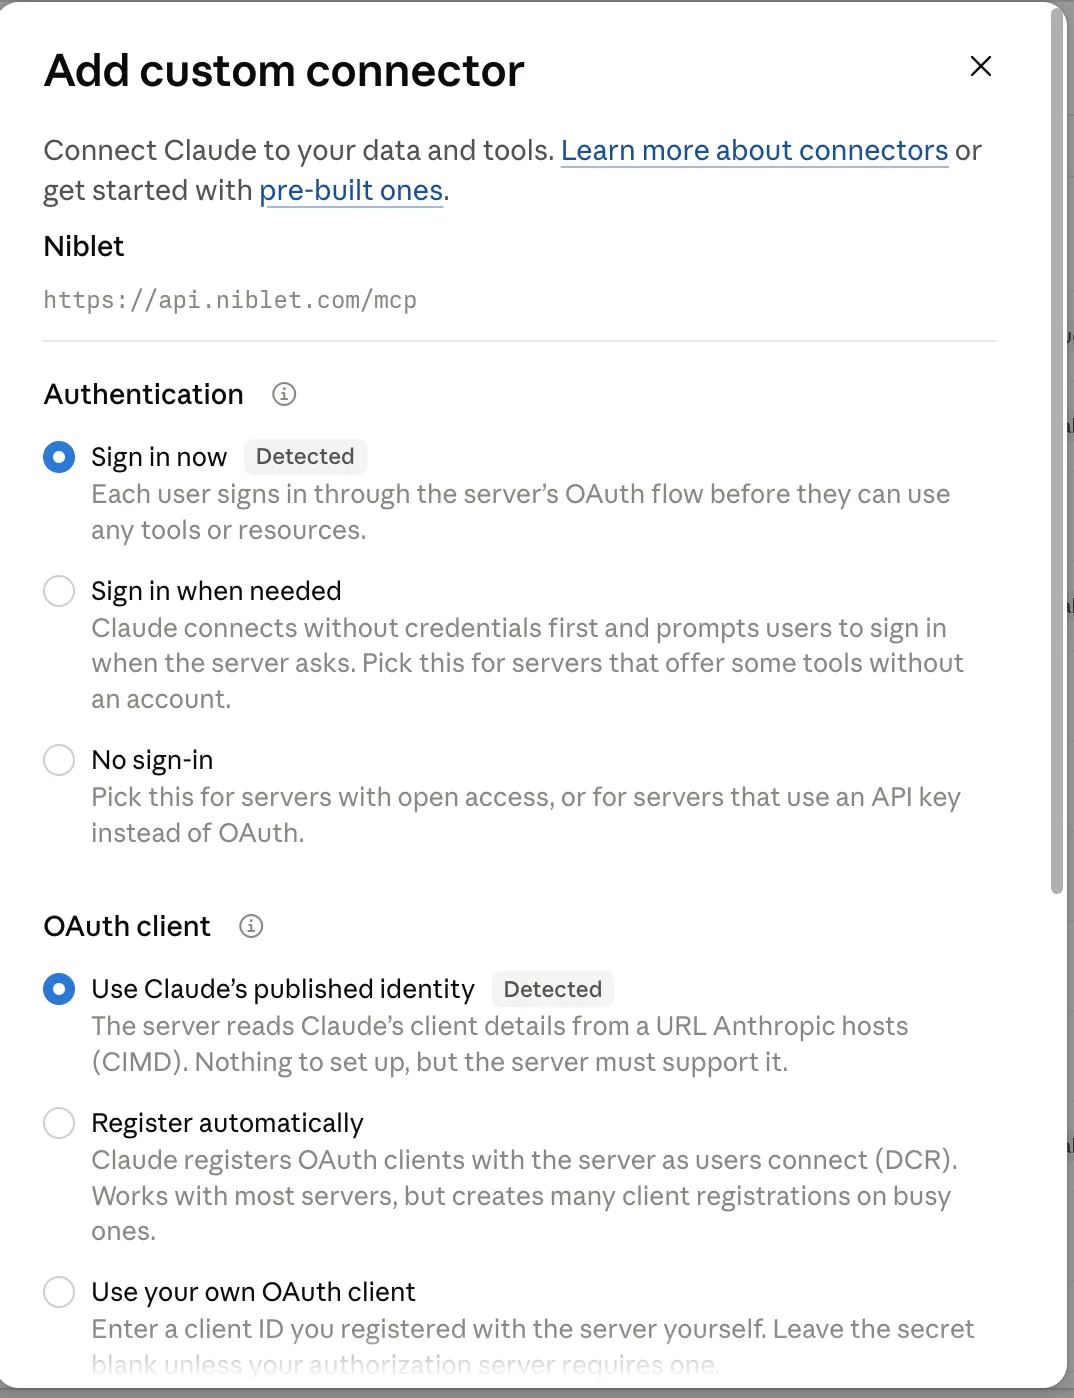
    In Claude Desktop or claude.ai, open Settings → Connectors → Add custom connector. Name it Niblet and paste https://niblet-api.pymodel.com/mcp. Claude detects sign-in and its own published identity on its own: keep both and choose Add.

    Claude’s Add custom connector dialog with the Niblet URL, “Sign in now” and “Use Claude’s published identity” both selected and marked Detected.
  2. Step 2

    Connect

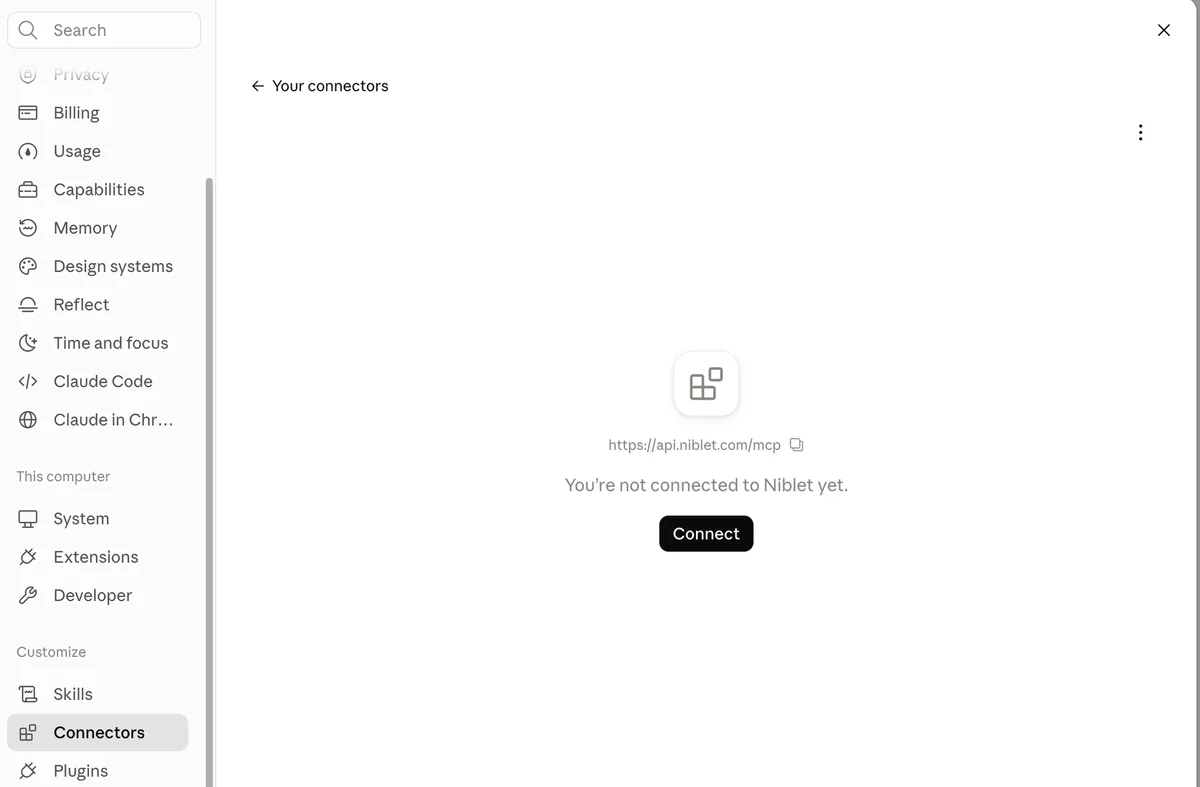
    Open Niblet under Your connectors and choose Connect.

    The Niblet connector page in Claude settings saying “You’re not connected to Niblet yet” with a Connect button.
  3. Step 3

    Sign in and allow

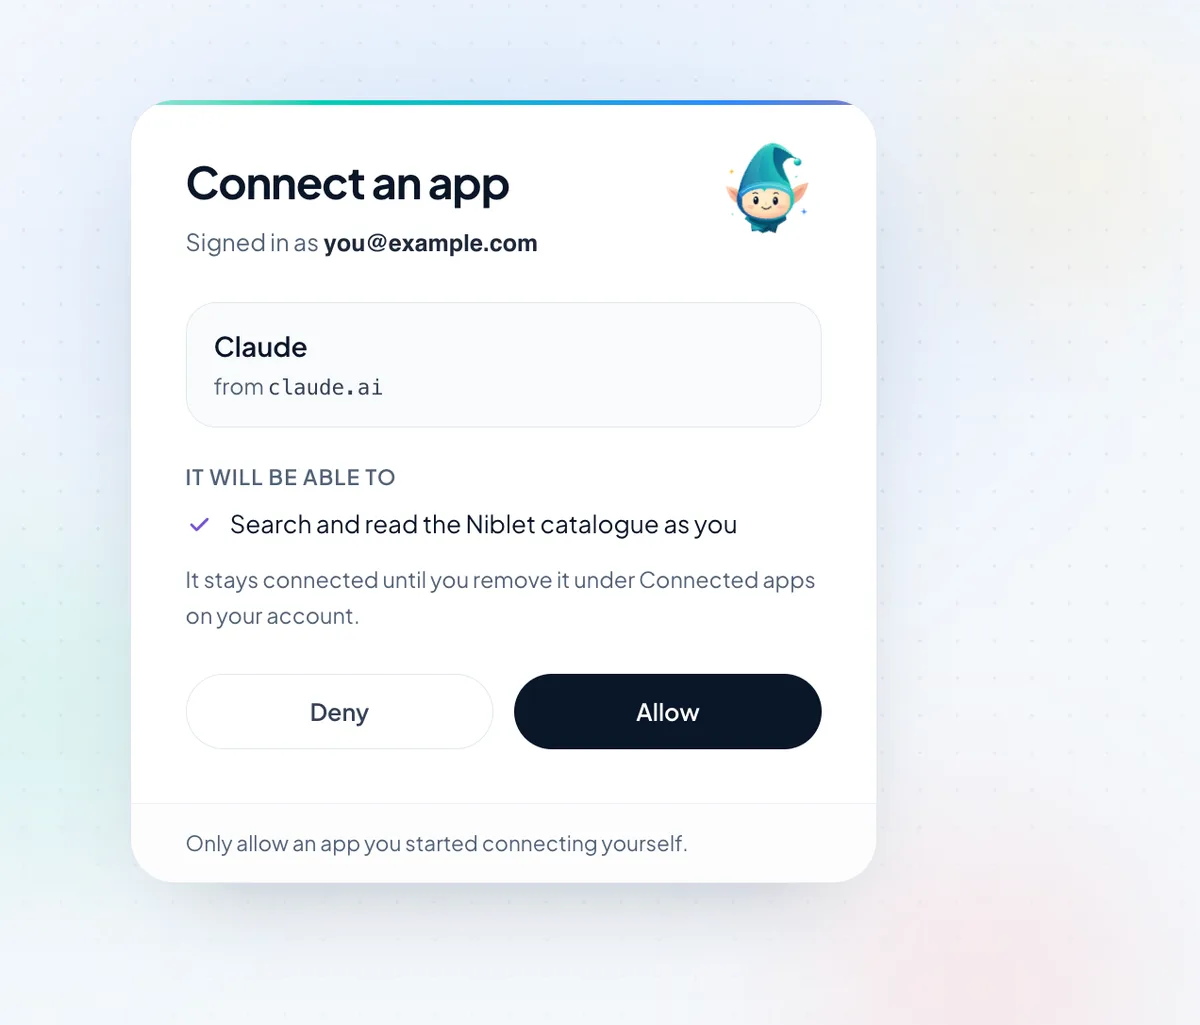
    A niblet.pymodel.com tab opens. Sign in, check that the app is Claude from claude.ai, and choose Allow. Only allow a request you started yourself.

    Niblet’s consent page: Claude from claude.ai asks to search and read the Niblet catalogue as you, with Deny and Allow buttons.
  4. Step 4

    Pick tool permissions

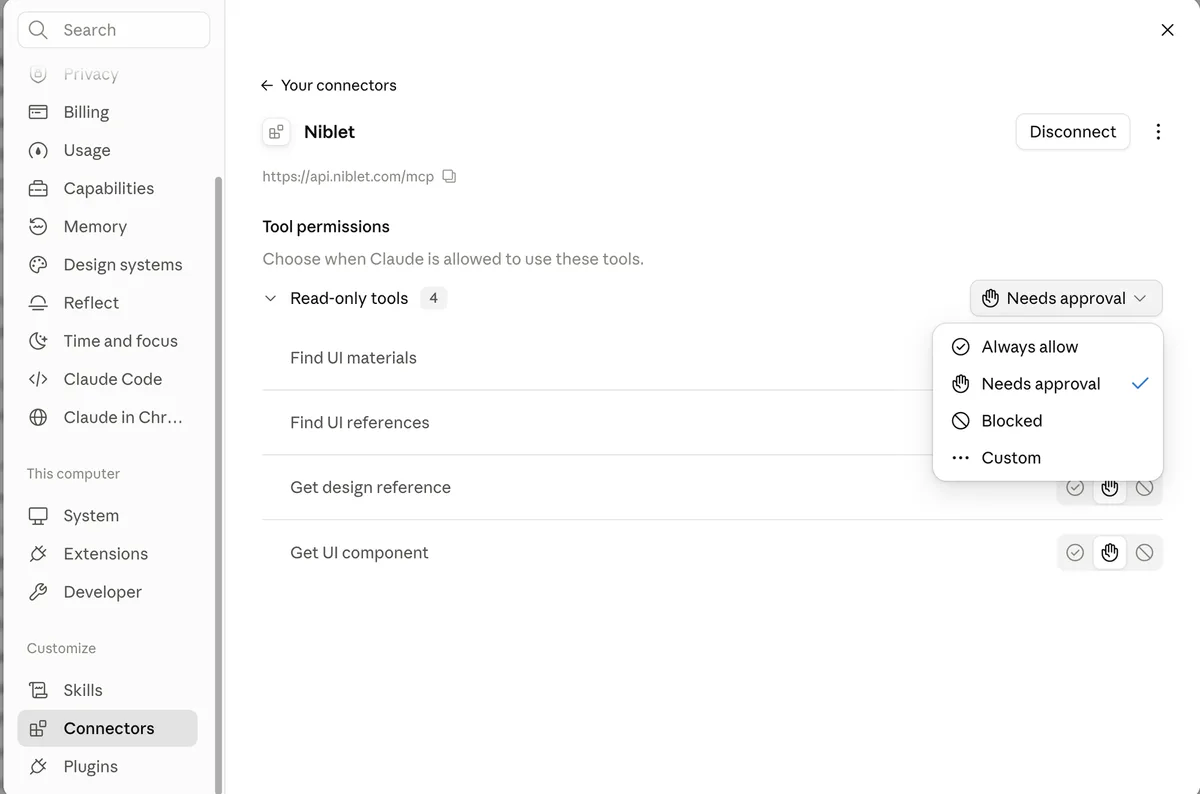
    All four tools are read-only. Leave them on Needs approval, or set Always allow so Claude can search without asking. Then try: “Use Niblet to find a reference for an empty inbox state.”

    The connected Niblet connector in Claude, listing four read-only tools with the Always allow, Needs approval, and Blocked options.

Revoke Claude any time under Connected apps on your dashboard. Claude shows a generic icon for every custom connector; that is Claude’s choice, not a failed connection.

✓

Coding Agent UI Checklist

Authoritative gates for coding agents before editing source code and before declaring UI work finished.

1. Before Writing

• Inspect existing components, shared tokens, and nearby views.

• Identify the single primary user task on this surface.

• Query find_ui_references only when evidence settles a decision.

2. While Building

• Use semantic tokens (ground, tile, sheet, ink, accent).

• Provide authentic empty, loading, error, and validation states.

• Reject generic placeholder grids, inert buttons, and visual slop.

3. Rendered Gate

• Render at narrow phone width (390px) and wide desktop (1440px).

• Exercise interactive focus, copy, scroll, and click feedback.

• Fix observable regressions rather than guessing from source.

Remote MCP config

Streamable HTTP with a bearer key. Exposes find_ui_references, find_ui_materials, get_design_reference, and get_ui_component. Your dashboard writes each of these with your key already in place.

Claude Code
claude mcp add --transport http --scope user niblet https://niblet-api.pymodel.com/mcp \
  --header "Authorization: Bearer niblet_at_…"
Codex — ~/.codex/config.toml
[mcp_servers.niblet]
url = "https://niblet-api.pymodel.com/mcp"
http_headers = { "Authorization" = "Bearer niblet_at_…" }
Cursor — ~/.cursor/mcp.json
{ "mcpServers": { "niblet": {
  "url": "https://niblet-api.pymodel.com/mcp",
  "headers": { "Authorization": "Bearer niblet_at_…" } } } }
Prove it from a shell
curl -s https://niblet-api.pymodel.com/mcp -H "Authorization: Bearer niblet_at_…" \
  -H "Content-Type: application/json" -H "Accept: application/json, text/event-stream" \
  -d '{"jsonrpc":"2.0","id":1,"method":"tools/list"}'

A refused request says why in its body: an empty header, an unexpanded variable, the setup placeholder, or a key that is not recognised.